1. Taking Photos
- WoW Camera starts with Shot mode.

- WoW Camera starts with Shot mode.

- Normal Shot Screen (일반적인 촬영 기능)
- Magic Effects (매직 효과 주기)
- Shot -> SubMenu -> Magic Effect로 진입.
- Supports following 12 effects on real-itme (다음 효과들을 지원한다-12개)
- Shot -> SubMenu -> Magic Effect로 진입.
- Supports following 12 effects on real-itme (다음 효과들을 지원한다-12개)
-> Evil Look, Stretch, Mosaic (Page 1)
-> Mirror (Left/Right), Mirror (Up/Down), Mirror(Left/Right/Up/Down) (Page 2)
-> Spiral, Wave 1, Wave 2 (Page 3)
-> Squeeze, Convex Lens, Concave Lens (Page 4)
- Touch sub-screen to change to full screen mode.
(해당 효과를 클릭하면 전체화면으로 확대되고, Shot Button을 눌러서 촬영)
- Shot -> SubMenu -> Magic Effect를 다시 누르면 취소됨.
- 다른 메뉴 선택시 자동으로 취소되고 해당 메뉴로 진입
- Touch sub-screen to change to full screen mode.
(해당 효과를 클릭하면 전체화면으로 확대되고, Shot Button을 눌러서 촬영)
- Shot -> SubMenu -> Magic Effect를 다시 누르면 취소됨.
- 다른 메뉴 선택시 자동으로 취소되고 해당 메뉴로 진입
- Color Effects (칼라 효과 주기)
- Shot -> SubMenu -> Color Effect로 진입.
- 15 Color effects are provided. (다음 효과들을 지원한다 15개)
-> Cartoon, Sketch, Charcoal (Page 2)
-> Lomo, Pencil Sketch, Pastel Sketch (Page 3)
-> X-Ray, Inversion, Brightness (Page 4)
-> Contrast, RedEye, GreenEye (Page 5)
- 해당 효과를 클릭하면 전체화면으로 확대되고, Shot Button을 눌러서 촬영
- Shot -> SubMenu -> Color Effect를 다시 누르면 취소됨.
- 다른 메뉴 선택시 자동으로 취소되고 해당 메뉴로 진입
- Thin Effect (날씬 효과 주기)
- Shot -> SubMenu -> Thin Effect 로 진입.
-> 날씬해진다.
- Shot -> SubMenu -> Thin Effect 다시 클릭하면 취소됨.
-> AnyTouch Function is disabled in Magic Effect, Color Effect mode.

-> Timer shot.

-> Display GRID on the shot screen.

-> Controlling Camera Flash (Auto/On/Off)

-> Switch Front-Rear Camera (iPhone 4 or later)
- Shot -> SubMenu -> Thin Effect 로 진입.
-> 날씬해진다.
- Shot -> SubMenu -> Thin Effect 다시 클릭하면 취소됨.
- 다른 메뉴 선택시 자동으로 취소되고 해당 메뉴로 진입
- Shot Control (촬영 제어하기)
- Shot Control (촬영 제어하기)
-> AnyTouch Function is disabled in Magic Effect, Color Effect mode.

-> Timer shot.

-> Display GRID on the shot screen.

-> Controlling Camera Flash (Auto/On/Off)

-> Switch Front-Rear Camera (iPhone 4 or later)
2. Navigating Photos.
- Click the photo icon located at left-bottom in Shot mode to enter Photo Album.

- Changing ThumbNail view mode - Large, Middle, Small.


- When you touch a photo, the photo is shown in Photo Viewer.


-> Photo Viewer 설명.
-> You can move to previous or next photo by flicking left or right.

-> You can move to previous or next photo by flicking left or right.

-> Pinch to zoom the photo.
Smart zoom: double touch the photo - zoom to max or zoom to fit..

Smart zoom: double touch the photo - zoom to max or zoom to fit..

-> You can also use arrow buttons to move to previous/next photos.

-> Action -> 사진 이동, 공유, Beauty로 넘어감.
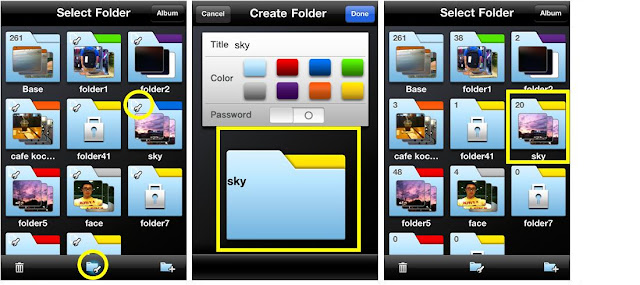
3. Folder Management
- Enter Folder Manager by clicking "Folder" Button in Photo Album


- Summary of Folder Manager screen. (기본 화면 설명 - 요약본).
- Add new folder.
- Click "Add Folder" button on lower right corner.
- Type folder name and select Color.
- Turn on "Password" switch if you want to create a secure folder.
- Click "Done" when everything is alright.


- Click "Add Folder" button on lower right corner.
- Type folder name and select Color.
- Turn on "Password" switch if you want to create a secure folder.
- Click "Done" when everything is alright.


- Changing folder property.
- Click "Folder Edit" button on the center of menu bar.
Tool mark on the folder indicates that you can change the property of the folder.
NOTE: YOU CANNOT EDIT THE PROPERTY OF "Base" FOLDER.
- Change folder properties as you like: name, color or password.
- Click "Folder Edit" button on the center of menu bar.
Tool mark on the folder indicates that you can change the property of the folder.
NOTE: YOU CANNOT EDIT THE PROPERTY OF "Base" FOLDER.
- Change folder properties as you like: name, color or password.

- Click Trash button on lower-left corner.
- Select folders to delete ("All" button selects all the folders except "Base" folder).
- Click Trash button on the sub-menu bar.
- Confirm delete.

- Moving photos between folders.
- Go to Photo Album view.
- Click "Export" button
- Select photos to move (Click "All" button selects all the photos in current folder)
- Click "Move" on the sub-menu bar.
- Select target folder.

- You can also move a single folder in Photo Viewer
- Click "Action" button and click "Move" on the sub-menu.
- Choose target folder.
- Done.
( Add screen shot here ).
4. Editing Photos
- You can edit a photo by clicking "Edit" button in Photo Viewer mode.
- You can edit a photo by clicking "Edit" button in Photo Viewer mode.

- You can add Speech bubbles, Stickers, Text Boxes in Edit mode.
- Click "Sticker" button to add speech bubbles or Stickers.
- Click "Text" button to add Text Box.

- Rotate photos.
- Click "Rotate" button.
- Rotate the photo as you like.
- Click "Rotate" button again to finish.

- Cropping Photo.
- Click "Crop" button.
- Move or Resize Crop Region as you like.
- Click "Crop" button again to finish.

- Applying Filter effects
- Click "Effect" button.
- Choose filter effect you want.
- Click "Effect" again to finish.

5. Cartoon - Creating your own photo story.
- Enter "Cartoon" button in Photo Album Mode.
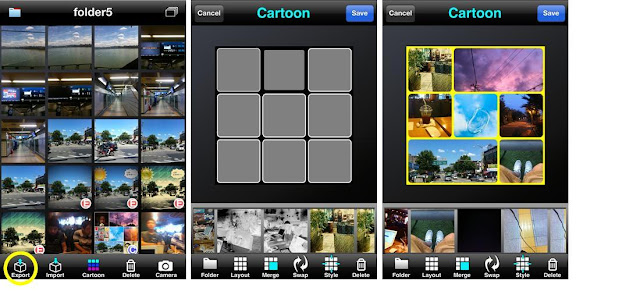
- Default screen. ( 기본 화면 설명 요약본)
- Change layout of the cartoon by clicking "Layout" button.

- Merging Cells.
- Click "Merge" button.
- Choose cells to merge by dragging on the cells.
- Click "Done" when you are finished.

- Putting Photos on the Cell.
- Photos on current folder are displayed just above the menu bar.

- Changing folder.
- Click "Folder" Button.
- Choose target folder.
- Source photo list will be updated to current folder.

- Detailing each cell.
- Touching a filled cell will zoom that cell.
- Flick inside the cell to position the photo.
- Pinch inside the cell to zoom in or zoom out the photo.
- Touch outside the cell to exit.

- Swapping photos between two cells.
- Click "Swap" button.
- Choose first cell.
- Choose second cell.

- Changing the style of current Cartoon.
- Click "Style" button.
- (Optional) Choose corner option : round or square.
- (Optional) Choose background color
- (Optional) Choose border color
- (Optional) Choose distance between cells.
- Click "Done" when you are finished.

- Saving Cartoon.
- Click "Save" button on upper-right corner of the screen.
- Choose Cartoon size
-

- Enter "Cartoon" button in Photo Album Mode.

- Default screen. ( 기본 화면 설명 요약본)
- Change layout of the cartoon by clicking "Layout" button.

- Merging Cells.
- Click "Merge" button.
- Choose cells to merge by dragging on the cells.
- Click "Done" when you are finished.

- Putting Photos on the Cell.
- Photos on current folder are displayed just above the menu bar.
- Touch a cell to focus.
- Touching a photo will put the photo into the cell in focus.
- Changing folder.
- Click "Folder" Button.
- Choose target folder.
- Source photo list will be updated to current folder.

- Detailing each cell.
- Touching a filled cell will zoom that cell.
- Flick inside the cell to position the photo.
- Pinch inside the cell to zoom in or zoom out the photo.
- Touch outside the cell to exit.

- Swapping photos between two cells.
- Click "Swap" button.
- Choose first cell.
- Choose second cell.

- Changing the style of current Cartoon.
- Click "Style" button.
- (Optional) Choose corner option : round or square.
- (Optional) Choose background color
- (Optional) Choose border color
- (Optional) Choose distance between cells.
- Click "Done" when you are finished.

- Saving Cartoon.
- Click "Save" button on upper-right corner of the screen.
- Choose Cartoon size
-

6. Sharing Photos
6.1. Copying Photos to CameraRoll in Photo Album screen.
1) Press "Export" Button.
2) Select photos to transfer to CameraRoll.
3) Presss "CameraRoll" button.

- Photo Gallery Export 메뉴를 통해 사진을 eMail로 보내기
6.2. Uploading Photos to SNS(Twitter, Facebook, Flickr) in Photo Album.
6.2.1. SignIn to SNS site (If you are already signed in, this step is not necessary).
1) Go to "Settings" screen on Shot mode.
2) Select SNS site.
3) Press "SignIn" button.

6.2.2. Uploading photos.
1) Go to Photo Album mode.
2) Press "Export" button.
3) Select photos.
4) Press "SNS" button.
5) Select SNS site.

6.3. Copying photos from CameraRoll to Photo Album.
1) Press "Import" button.
2) Select Album.
3) Select photos and press "Copy" button.

6.4. Sharing photos in Photo Viewer.
1) Press "Action" button in Photo Viewer.
2) Press "Share" button on the sub-menu.
3) Select sharing mode (SNS/eMail)
4) Fill in the blanks and upload photo.

1) Press "Import" button.
2) Select Album.
3) Select photos and press "Copy" button.

1) Press "Action" button in Photo Viewer.
2) Press "Share" button on the sub-menu.
3) Select sharing mode (SNS/eMail)
4) Fill in the blanks and upload photo.

7. 환경 설정하기.
- Shot 모드에서 Setting 버튼을 클릭하여 환경 설정 화면으로 진입한다.
- 각 셋팅에 대한 세부항목 설명.

- GPS on or off & Timer Stamp

- 사진 품질 지정하기.

- 필터 효과 지정시 사진 품질

- 기탕 등등

- GPS on or off & Timer Stamp

- 사진 품질 지정하기.

- 필터 효과 지정시 사진 품질

- 기탕 등등
- Information 설명은 제외.